How to create a Stripe account and connect it to your shop


Stripe is vailable for businesses in 47 countries. Accept payments from anywhere in the world.
See the list of countries where you can open a business Stripe account
IMPORTANT!!! One Stripe account can only be associated with one store and platform. If you are opening another store (regardless of whether it is on the DIY Markt platform or on any other platform), you must create a new account on the same Stripe panel and then connect this new account to your second store. If you try to connect multiple stores or platforms to the same Stripe account, the Stripe payment system will automatically disconnect all stores from the payment system and you will not be able to accept payments.
For example, you have connected your Stripe account to shop “A” on the DIY Markt platform. If you open shop “B” on the DIY Markt platform (or on another platform), you must connect it to a different Stripe account than shop “A”. (To learn how to manage Stripe account and creat additional accounts, follow the link at the end of this article).
Go to Vendor Dashboard > Settings > Payment.
In the “Payment” panel click on “Add Payment Method“. In the dropdown menu, click “Direct to Stripe“.
In the opened window, click the “Connect with Stripe” button.
You will be redirected to the Stripe connection page. Enter the email address you would like to register your Stripe account with and click “Continue“.
Enter the password for your account.
Enter your phone number to secure your account.
Enter the verification code that you will receive as an SMS to your phone number.
On the next page, you will see a letter code. You need to write it down and keep it in a safe place. It is the emergency backup code that you can use to unlock your Stripe account in case you ever lose your phone or don’t have a connection to receive SMS with a verification code.
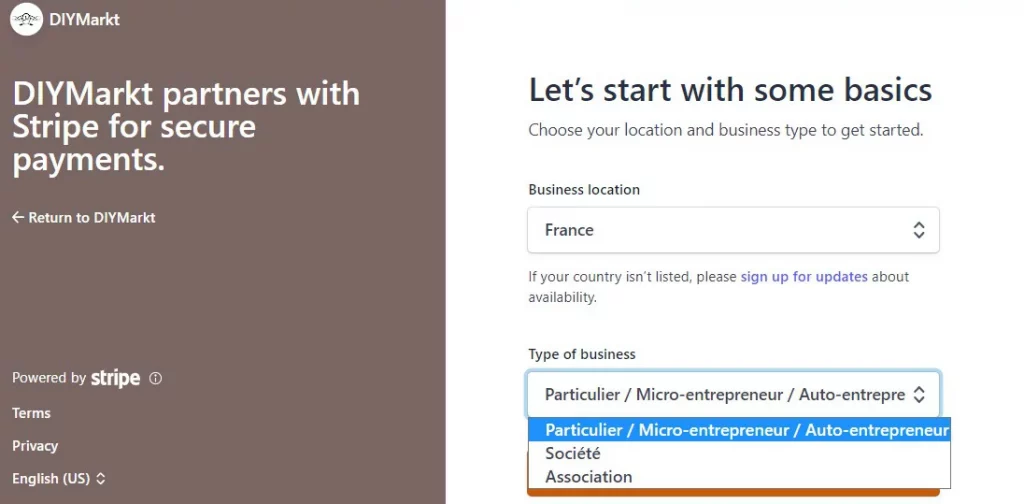
Select the country where your business is located and chose the type of your business:
Click on the “Continue” button.
On the next page, enter your personal information. Fill in all fields and click “Continue“.
On the next page, enter your business details:
Then click the “Continue” button.
On this page add your bank to receive payouts:
Click the “Continue” button.
On this page add public details for customers:
Click the “Continue” button.
Check all the information and click Submit.
To edit some details before submitting, click on the “pencil” icon in the upper right corner of the desired section.
Once you click on the “Submit” button, you will be redirected to your shop dashboard. There you will see the notification that your account is connected with Stripe.
Once you’re done, go to your email. There you will receive a message from Stripe asking you to verify your email address. Follow the link in the message and sign in to your Stripe account.
How to log in and manage your Stripe account (step-by-step guide).